Lab Simulation 3 – IPv6 OSPF Virtual Link
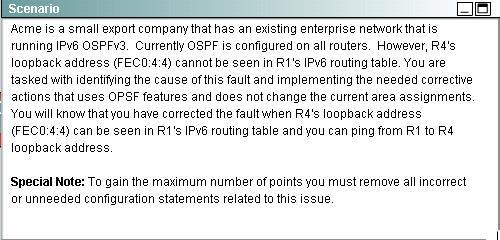
Answer:
To troubleshoot the problem, first issue the show running-config on all of 4 routers.
Pay more attention to the outputs of routers R2 and R3.
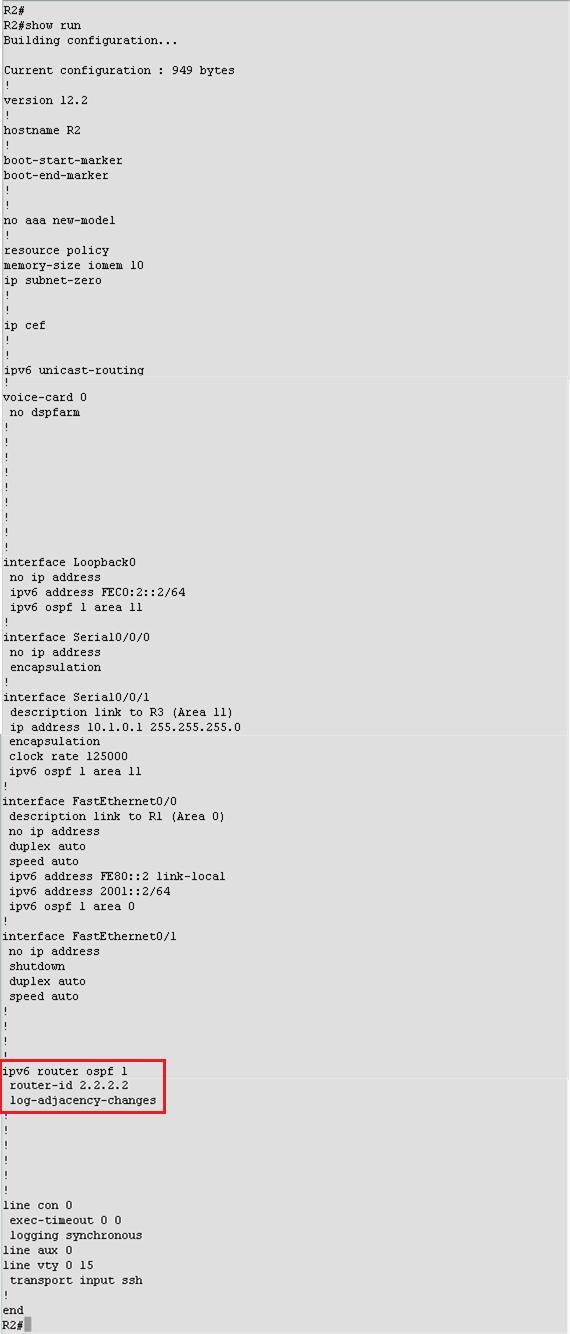
The output of the “show running-config” command of R2:
And
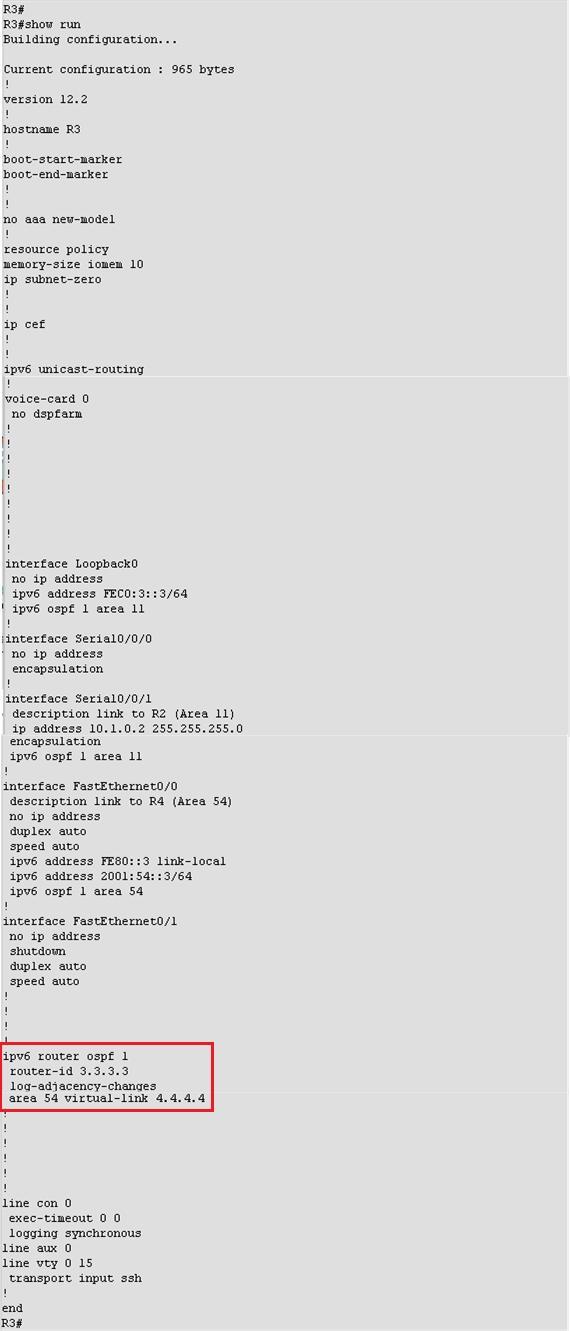
The output of the “show running-config” command of R3:
R2> enable
R2# configure terminal
R2(config)# ipv6 router ospf 1
R2(config-rtr)# area 11 virtual-link 3.3.3.3
Save the configuration:
R2(config-rtr)# end
R2# copy running-config startup-config
(Notice that we have to use neighbor router-id 3.3.3.3, not R2’s router-id 2.2.2.2) + Configure virtual link on R3 (from the second output above, we learned that the OSPF process ID of R3 is 1 and we have to disable the wrong configuration of “area 54 virtual-link 4.4.4.4”):
R3> enable
R3# configure terminal
R3(config)# ipv6 router ospf 1
R3(config-rtr)# no area 54 virtual-link 4.4.4.4
R3(config-rtr)# area 11 virtual-link 2.2.2.2
Save the configuration:
R3(config-rtr)# end
R3# copy running-config startup-config
You should check the configuration of R4, too.
R4(config)# ipv6 router ospf 1
R4(config-router)# no area 54 virtual-link 3.3.3.3
R4(config-router)# end
After finishing the configuration don’t forget to ping between R1 and R4 to make sure they work well!
Note: If you want to check the routing information, use the show ipv6 route command ,not “show ip route”.
To troubleshoot the problem, first issue the show running-config on all of 4 routers.
Pay more attention to the outputs of routers R2 and R3.
The output of the “show running-config” command of R2:
And
The output of the “show running-config” command of R3:
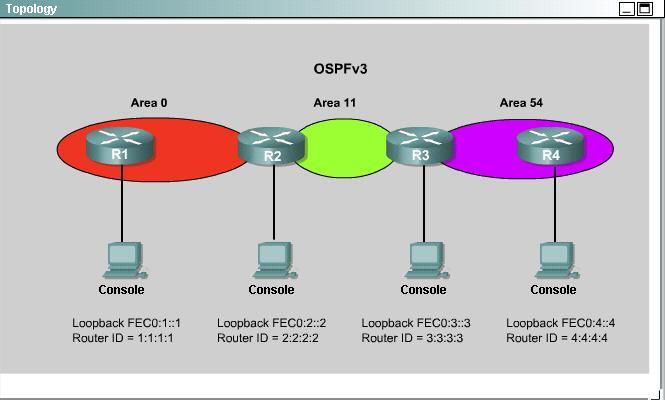
We knew that all areas in an Open Shortest Path First (OSPF) autonomous system must be physically connected to the backbone area (Area 0). In some cases, where this is not possible, we can use a virtual link to connect to the backbone through a non-backbone area. The area through which you configure the virtual link is known as a transit area. In this case, the area 11 will become the transit area. Therefore, routers R2 and R3 must be configured with the area
virtual-link command. + Configure virtual link on R2 (from the first output above, we learned that the OSPF process ID of R2 is 1):R2> enable
R2# configure terminal
R2(config)# ipv6 router ospf 1
R2(config-rtr)# area 11 virtual-link 3.3.3.3
Save the configuration:
R2(config-rtr)# end
R2# copy running-config startup-config
(Notice that we have to use neighbor router-id 3.3.3.3, not R2’s router-id 2.2.2.2) + Configure virtual link on R3 (from the second output above, we learned that the OSPF process ID of R3 is 1 and we have to disable the wrong configuration of “area 54 virtual-link 4.4.4.4”):
R3> enable
R3# configure terminal
R3(config)# ipv6 router ospf 1
R3(config-rtr)# no area 54 virtual-link 4.4.4.4
R3(config-rtr)# area 11 virtual-link 2.2.2.2
Save the configuration:
R3(config-rtr)# end
R3# copy running-config startup-config
You should check the configuration of R4, too.
R4(config)# ipv6 router ospf 1
R4(config-router)# no area 54 virtual-link 3.3.3.3
R4(config-router)# end
After finishing the configuration don’t forget to ping between R1 and R4 to make sure they work well!
Note: If you want to check the routing information, use the show ipv6 route command ,not “show ip route”.

In my exam there was the same simlet. I checked the settings and added the Loopback interface on R4 to Area 54, removed the configuration of the virtual link on R4 and R3 and configured a virtual link between R2 (area 11 virtual-link 3.3.3.3) and R3 (area 11 virtual-link 2.2.2.2). And the loopback interface was shown in the routing table of R1.
However, the IP addresses in Area 11 were IPv4, I was asked if I should change this – however, the question was explicitly mentioned: In order to get the full number of points, all configurations related to the problem should be changed. did someone change it?