Correct Answer:

Explanation/Reference:
Explanation:
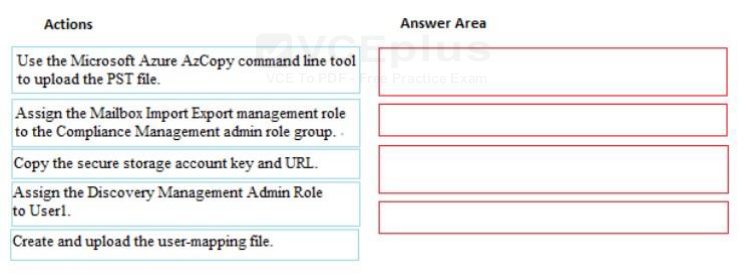
Box 1:
Prerequisite: You have to be assigned the Mailbox Import Export role to import PST files to Office 365 mailboxes.
Box 2:
Step 1: Copy the SAS URL and install Azure AzCopy
Box 3:
Step 2: Upload your PST files to Office 365
. Open a Command Prompt on your local computer.
. Go to the directory where you installed the AzCopy.exe tool in Step 1. If you installed the tool in the default location, go to %ProgramFiles(x86)%Microsoft SDKsAzureAzCopy.
. Run the following command to upload the PST files to Office 365.AzCopy.exe /Source: /Dest: /V:
Box 4:
Step 3: Create the PST Import mapping file
After the PST files have been uploaded to the Azure storage location for your Office 365 organization, the next step is to create a comma separated value (CSV) file that specifies which user mailboxes the PST files will be imported to.
You will submit this CSV file in the next step when you create a PST Import job.
1. Download a copy of the PST Import mapping file.
2. Open or save the CSV file to your local computer. The following example shows a completed PST Import mapping file (opened in NotePad). It’s much easier to use Microsoft Excel to edit the CSV file.
Example file:
Workload,FilePath,Name,Mailbox,IsArchive,TargetRootFolder,SPFileContainer,SPManifestContainer,SPSiteUrl
Exchange,,annb.pst,[email protected],FALSE,/Inbox,,,
Exchange,,annb_archive.pst,[email protected],TRUE,/Inbox,,,
Etc.
References: https://support.office.com/en-us/article/Use-network-upload-to-import-PST-files-to-Office-365-103f940c-0468-4e1a-b527-cc8ad13a5ea6