Correct Answer:

Explanation/Reference:
Note:
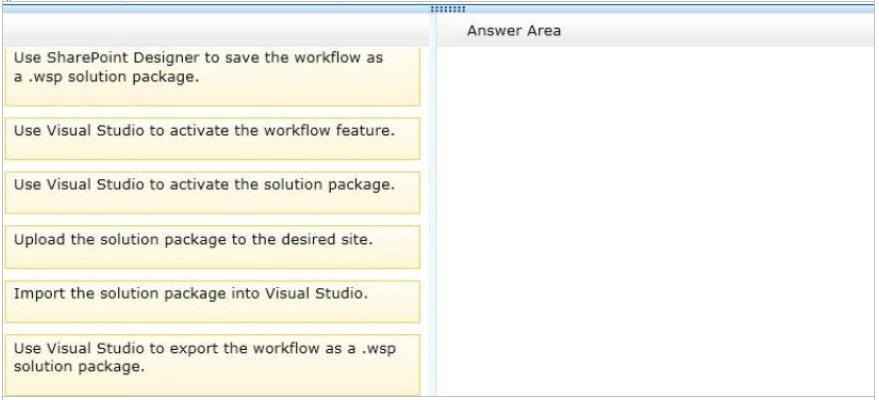
Box 1 (SharePoint Designer): Use SharePoint Designer to save the workflow as a .wsp solution package.
Visual Studio allows you to import reusable workflows created in SharePoint Designer and convert them to code workflows for use in your SharePoint sites.
Box 2(Visual Studio): Upload the solution package to the desired site.
Box 3(Visual Studio): Use Visual Studio to Active the solution package.
After a solution package (.wsp) file is uploaded and activated on the target website (that is, the SharePoint site collection), the features that are contained in the package are installed and available for activation.
Note 2: Steps:
1. Creating a simple, reusable workflow in SharePoint Designer.
2. Exporting the SharePoint Designer reusable workflow to a .wsp file and into SharePoint.
3. Importing the .wsp file into Visual Studio by using the Import Reusable Workflow project.
4. Altering the workflow by adding code.
5. Using the imported workflow in a SharePoint site.
* When you create a declarative workflow in Microsoft SharePoint® Designer 2010, you can save the workflow as a template in a SharePoint solution package (.wsp) file. In some circumstances, you may need to import your workflow template into the Microsoft Visual Studio® 2010 development system, and repackage it as a Visual Studio project—for example, if you want to create a solution package that contains both a declarative workflow and custom-coded workflow activities.
* Visual Studio SharePoint workflow projects deploy just like other Visual Studio SharePoint projects.
Reference: How to: Build and deploy workflow custom actions; Walkthrough: Import a SharePoint Designer Reusable Workflow into Visual Studio.